Author Archive

Competitive Programming vs Software Programming

Wednesday, March 15th, 2017

This dilemma always comes up for those college students engrossed in learning programming. What to invest more of their time on? Software programming vis-a-vis competitive programming.

Let’s start by comparing the two.

What is Competitive programming?
Competitive programming is what most college students do to hone their algorithmic knowledge and mastery over various data structures. It not only improves problem solving capability but also augments a person’s speed and accuracy when solving such problems. Competitive programming is basically taking programming up as a sport. Participants are given a set amount of time to solve a number of complex algorithmic questions. It tests a person’s raw thinking capability and ability to grasp problems. It expects an extremely fast solution which need not be the simplest one possible.

What is Software programming?
Software programming is less of a perfect science, compared to the calculated laser precision of competitive programming. You are expected to solve real world problems, in a way that is simple, efficient and also easy to maintain. You are not expected to use complex algorithms to calculate the answer in milliseconds, but to write simple code which gets the job done in reasonable time. Software programming is the development of apps which run on mobile, PC and other platforms.

Now let’s get to the differences between the two :

Competitive Programming

  • The problem is solvable within the given time and constraints using the given resources
  • Short time commitment and instant gratification
  • Skill level is easily quantified

Software Programming

  • The problem “may” be solvable within the given time and constraints using the given resources
  • Long time commitment and gradual gratification
  • Skill level is not easily quantifiable

So which one should you do ?
There is no right answer to this question. Most interviews are composed of algorithmic questions but the actual job will entail more of software programming. So it is obviously healthy to have a good mix of both under your belt by the time you start job hunting, The ratio of that mix is left to you to figure out.

Happy Coding,
Karthikeyan M

Why do we code ?

Saturday, January 21st, 2017

For people, computer programming may mean many things. It could mean their livelihood, their passion, their meal ticket, their escape from reality, a path to a better life or maybe it’s all gibberish to them no matter how you put it. Yeah, people code for many reasons.

But, why do I code ?
Many people do take up competitive programming as it pretty much guarantees you a bigger package than your peers. But those people do not mind the tireless nights, the sleep deprived mania induced by bad logic, the bleary eyed mornings and the thankless hours of effort you put in to climb the leaderboards.

But for the rest of us who are allergic to menial labour and value our sleep over all else, we need something more enticing. Something which gives a greater high than any drug known to man, something which sets the endorphin rushing through your veins, something which causes us to forego our treasured sleep, late night DOTA games, food and social life.

All for that tiny green tick mark called the AC. Once you get your first taste of the “Accepted” sign, you’ll never be able to live without it again. Your body will crave it. You’ll dream about it. You’ll obsess over it like it is the single most important thing in your life. And it may very well be. It drives your very existence. It drives you to learn and re-learn. That is what motivates the best of us. We are coders, and we are all addicted to what we do.

SPOJ Classical Problem FARIDA Dynamic Programming Tutorial

Friday, December 16th, 2016


This will be an editorial of the FARIDA problem from SPOJ which is an basic dynamic programming problem. It is easily solved by knowing the initial states and the simple transition from previous states to the next ones.

This problem is from : http://www.spoj.com/problems/FARIDA/

Problem Statement:

Once upon time there was a cute princess called Farida living in a castle with her father, mother and uncle. On the way to the castle there lived many monsters. Each one of them had some gold coins. Although they are monsters they will not hurt. Instead they will give you the gold coins, but if and only if you didn’t take any coins from the monster directly before the current one. To marry princess Farida you have to pass all the monsters and collect as many coins as possible. Given the number of gold coins each monster has, calculate the maximum number of coins you can collect on your way to the castle.

This is the problem faced by FARIDA, a cute princess, many of you would have come across early in your adventure across dynamic programming kingdom. With an acceptance percentage of around 29%. This would be one of the easiest DP problems, but can lay the foundations to better understanding of DP states and their transition.

So, the problem basically reduces to :

Given an array, output the maximum sum of elements you can make from a subset of the array such that no two consecutive numbers from the original array are included in the subset.

Now, considering a DP[i] to be the maximum sum obtainable under such conditions till ‘i’ in the array. The DP transitions are intuitively derived as:
DP[i] = Maximum of ( DP[i – 1] ) &  ( DP[i] + element ‘i’ from the array )

If we decide not to include element ‘i’ the maximum obtainable sum up to ‘i’ will be DP[i – 1]. If we decide to include DP[i] then the maximum will be DP[i – 2] + Element ‘i’, since we cant include element ‘i – 1’ in this.
So you can see how the maximum of these two values will give us the general DP recurrence. Then, the initial states easily work out to be
DP[0] = First element in array
DP[1] = Maximum of first and second elements in array.

Lastly including condition for n = 0, and n = 1, the problem is solved.

This should easily bring you an AC and 0.02 points on SPOJ as of writing the article.

The problem BadNeighbours from Top Coder is also very similar to this one.

Here is the Java code to clear things up for you:

import java.util.Scanner;

class FARIDA {
public static void main(String[] args) throws Exception {
Scanner sc = new Scanner(System.in);
int n = sc.nextInt();
for (int i = 0; i < n; i++) {
int t = sc.nextInt();
int[] a = new int[t];
for (int j = 0; j < t; j++) {

a[j] = sc.nextInt();

}

long[] dp = new long[t];

if (t == 0) {

System.out.println("Case " + (i + 1) + ": 0");

continue;

}

if (t >= 1) {
dp[0] = a[0];
}
if (t >= 2) {
dp[1] = a[0] > a[1] ? a[0] : a[1];
}
if (t >= 3) {
for (int j = 2; j < t; j++) {
dp[j] = Math.max(dp[j - 1], dp[j - 2] + a[j]);
}
}
System.out.println("Case " + (i + 1) + ": " + dp[dp.length - 1]);
}
}
}

[Tutorial]PLANEDIV Problem Solution in JAVA : CodeChef December 2015

Wednesday, December 30th, 2015

This is a walkthrough on how I solved the competitive coding problem PLANEDIV which appeared on CodeChef’s December Challenge 2015 using Java. I will include the code and also the explanation. You can find the problem at https://www.codechef.com/problems/PLANEDIV

Problem Statement:

First we start by looking through the problem statement.

Chef is working with lines on a 2-D plane.
He knows that every line on a plane can be clearly defined by three coefficients A, B and C: any point (x, y) lies on the line if and only if A * x + B * y + C = 0.

Let’s call a set of lines to be perfect if there does not exist a point that belongs to two or more distinct lines of the set.
He has a set of lines on a plane and he wants to find out the size of the largest perfect subset of this set.

Simplified:

So the problem statement defines a perfect set as a set of lines in which no point belongs to two or more distinct lines of that set.For a point to not belong to two distinct lines, the two lines must not intersect. That is, they must be parallel.

In it’s most basic form, the problem asks us to find the set containing the largest number of DISTINCT PARALLEL lines.

Mathematical Explanation:

To do that we invoke our knowledge of basic 2D geometry. Two lines are parallel if they have the same slope. And they are distinct if they have different intercepts. So, for two lines to be distinct and parallel, they have to have the same slope but different intercepts.

This is the basic mathematical concept required to solve this problem.

Java Explanation:

There are N lines in the input and each line has 3 characteristics A (X – coefficient), B (Y – coefficient), C (Intercept). We will store them all in a 2 Dimensional array of double data type having N x 3 elements.

We use a string tokenizer to parse the data into our 2D array. While parsing the input, lets also calculate the slope. Straight off the bat, we see a problem. For lines parallel to the Y – axis, the slope is infinity. We will store this as -0.0. For such lines the Y – Coefficient is 0 we will evaluate the slope of such lines to -0.0 (Infinty) separately.

Java allows us to distinguish between 0.0 and -0.0. Its just another odd quirk of the double data type in java and we will take advantage of it.

Java does allow you to store infinity as “Infinity” in the double class, but I’ll be ignoring that as -0.0 will be
easier to deal with, in my opinion.

Another problem is for lines parallel to the X – Axis, they have Infinite Intercept. We will use their Y -Intercept instead of their X – Intercept to distinguish between lines parallel to the X – Axis.

Now all we have to do is get the slopes of eaach line, relate it to itss intercept, and see how many lines have the same slope but different intercept. The largest of those numbers gives the answer.

The slope is given by

if(Coefficient of Y != 0)
slope = - Coefficient of X / Coefficient of Y = -A/B
else
slope = -0.0

and the intercept

if(Coefficient of Y != 0)
slope = - Intercept / Coefficient of Y = -C/B
else
slope = - Intercept / Coefficient of X = -C/B

Once we’ve calculated the slopes and intercept, we simply store them pair wise in a data structure. 2D arrays can be used but a neater implimentation would be to use the Point class in Java. It takes two parameters X and Y. In our case, X would be the slope and Y would be the intercept.

Then we count the number of lines with same slope but different intercept. To make this easier we use the Comparable interface to sort them by slope and then by intercept.

List points = new ArrayList();
for (int m = 0; m < N; m++) {
points.add(new Point.Double(slopes[m], intercepts[m]));
}
Collections.sort(points, new Comparator() {
public int compare(Point.Double x1, Point.Double x2) {
int result = Double.compare(x1.getX(), x2.getX());
if (result == 0) {
result = Double.compare(x1.getY(), x2.getY());
}
return result;
}
});

The last thing to do is to count the number of lines with same slope and different intercept. The largest of these will be the answer.

The Final Solution:

Putting it all togethter, we have the solution.
Java Solution Code : PLANEDIV – CodeChef Problem
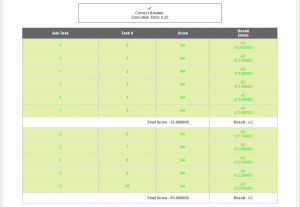
It passes all test cases in 0.25 seconds, giving us the full 100 points.
Apple

The code should be self explanatory after reading the about tutorial but if you do have any questions, feel free to post them as a comment.

-Tutorial by Karthikeyan M

[Book Review] Killing Floor By Lee Child

Monday, December 28th, 2015

Book Name : Killing Floor
Author : Lee Child
First Published on : March 17th 1997
Number of Pages : 525

Killing Floor – Summary :

The story revolves around the protagonist Jack Reacher, an ex-military policeman who wanders around the country after his discharge from the military. He discovers that he is wrongly accused of murder and is shipped off to jail for a few days. He is acquited and finds that the person murdered was his brother. He goes into the town of Margarave to find the killer and exact revenge.

Along the way, many of Reachers friends betray him but he manages to outsmart them. He uncovers a huge money counterfeiting ring to be the cause of his misfortune and aims to destroy them.

Review :

The story and the writing is fantastic. The author has beautifully built up tension wherever it is needed. Twists are many in number but sometimes appear predictable.

It has a realistic end to it and gives you good reason to grab the next book in the series of Jack Reacher as well.
The story seems to be a bit slow at some places but it does not dull the shine of the book.

Overall, ‘Killing Floor’ By ‘Lee Child’ is a good read if you have some time on your hands.

– Reviewed by karthikeyan M

[Tutorial] Scatter Effect in Photoshop

Tuesday, December 22nd, 2015

In this tutorial I will be teaching you how to make a basic scatter effect in PhotoShop. We will be creating our own brush to scatter the image in various directions.

I will be using this image of Robert Downey Jr to demonstrate this effect.

robert-downey-jr-th-annual-people-choice-awards-portraits-january-52831773


Creating the Scatter Brush:

First, create a new canvas with the dimensions of 10 x 10 pixels. Fill it with Black and click on Edit > Define Brush Preset. Name it whatever you want and click Save. This is the brush we will be using.

Setting up the Subject

Now, back to RDJ. Flip the image so that he faces the opposite direction and copy the whole layer. Then create a new layer and paste the contents which you just copied.

3

In the new layer, Select parts of him that you want to scatter and transform it to cover the whole of the image. Ctrl + T is the shortcut to Transform your selection.

3

Add a layer mask to this layer and fill it with black. The whole layer should be invisible now. Select the brush tool and go to the new brush preset which we created. (Right click with the brush tool to look at a list of brush presets)
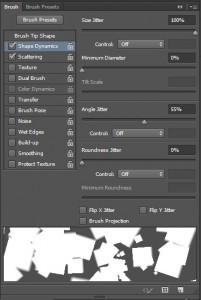
Go to Brush Options and enable Shape Dynamics and Scattering. Play around with the setting until you are satisfied.

3

Scattering the Subject:

Now change the Foreground Color to White and paint the places where you want to scatter the image.
Erase the places where you’ve gone wrong with a normal brush and Black Foreground color.

3

And the finished product:

Add a layer mask to the original layer as well and with the Foreground Color as Black paint a little inside the subject to give the illusion of the particles having been broken off of the subject.

3

[Review] James Cameron’s Avatar: The Game

Tuesday, December 22nd, 2015

Publisher: Ubisoft
Game Studio: Ubisoft Montreal
Engine: Dunia
Release Date: December 1, 2009
Reviewed By: Karthikeyan M

The game starts off two years before the movie takes place. You are in the shoes of Able Ryder, a military grunt arriving in Pandora. The game doesn’t do much work of explaining the story and you will find the game confusing if you haven’t watched the movie before. The game revolves around a precious mineral which the Na’vi hoard and the humans want. You are forced to decide which side you will support – about 45 minutes into the game.

1

Pros+

Human part of game play is good
Graphics are breath taking

Cons-

Controls are clunky for the Na’vi
Game becomes repetitive after a while

Human Gameplay

The gameplay branches off after you’ve made your alliance. If you’ve made your alliance with the humans, you will be given advanced weapons and various special abilities to destroy the Na’vi horde. The controls are passable and camera tracking is tolerable. This is the side you should choose in your first play through.
avatar-heade2

Na’vi Gameplay

The Na’vi side of the game is terrible. You are a clumsy 10 foot beast with barely any sense of direction. You will almost never be pointing or attacking in the direction of enemies. You get banshees and dire horses to ride but that doesn’t do much to take your mind off of the horrible controls.
3

Graphics

The graphics are mind blowing. Ubisoft Montreal has done a splendid job of bringing to life the lush flora and fauna of  Pandora. As a bonus those with a 3D capable TV will be able to play this game entirely in 3D.

The Verdict

Try the game only if you are a fan of the movie. Otherwise don’t even think about it.

[Review] Xiaomi Mi 4i

Wednesday, June 24th, 2015

Mi-4

I bought the Xiaomi Mi 4i from Flipkart and here is my review of the latest flagship from Xiaomi after a month of use.

The Packaging:
As is the case with all Xiaomi products, the package is minimalistic. A sim card remover and charger is in the box and that’s all there are besides the manuals and paperwork.

Looks and Aesthetics:
The phone is mostly made of plastic and the front is all glass. It looks decent but definitely hasn’t inherited the stunning looks of the Xiaomi Mi 3. It is slim enough to fit in your pockets without much hassle even if you put a case on it.

The Screen:
The 5 inch screen is has a resolution of 1080 x 1920 pixels which is the same as that of the Mi 3. It has good visibility even under direct sunlight and the brightness level is pretty sufficient. Colours are sharp and you can alter the saturation levels to your liking.

Connectivity:
Dual Sim 4G, 3G, 2G, GPS, GLONASS, WiFi, Bluetooth 3.0, USB On the Go cover all your needs. There is no HDMI Out, but you can mirror your screen on a secondary display using MiraCast.

Under The Hood:
The Xiaomi Mi 4i runs on the powerful Octa-Core Snapdragon 615 SoC. It runs smoothly on the MIUI interface and I’ve had no issues with lag so far. Demanding and graphically intensive games are easily handled by the Adreno 405 GPU.

The Battery:
A Non-removable Li-Ion 3120 mAh battery powers the Xiaomi Mi 4i. Even on heavy usage it should easily last a day. But don’t expect it to last more than that. I’ve used it moderately on occasional 3G browsing and heavy music playback for 1.5 days without having to charge it.

The Camera:
The camera is as good as that found in the Xiaomi Note 4G and the Mi 3. No complaints here. Low light shots suffer from a bit of grain but you cant complain at this price point. The dual tone flash captures skin tones accurately and a lot better than conventional dual flashes.

Verdict:
Despite the price drop in the Mi 4 recently, the Xiaomi Mi 4i still remains a viable option. If you are in the market for a phone in this price bracket, I’d suggest you go for it without a second thought.

Camera samples:

Under Good Lighting:
IMG_20150505_080433_HDR

IMG_20150505_084231_HDR

[Review] Xiaomi Mi3

Wednesday, October 29th, 2014

I recently purchased the Xiaomi Mi3 from FLipkart and after 2 months of using it, here’s what I have to say about it.

Following the same trade principle of Motorola’s Moto G, the Xiaomi is extremely well priced for the hardware it offers.

xiaomi_mi_3_india_launch

The Packaging:

The box is minimalistic and recyclable. Xiaomi has decided to go for a no-nonsense box. It is small and doesn’t contain much of the unnecessary paperwork that most other phone manufacturers tend to include. There is a USB cable, wall wart and a pin to remove the SIM tray. A small Quick Start booklet and that’s all.

Looks and Aesthetics:

The phone looks phenomenal. The full glass front and the brushed metal back look simply stunning. It beats every other phone Ive seen in terms of first impressions. Its comfortable to hold and carry around. You can buy various coloured back stick-on cases. The only niggle here is that the Xiaomi Mi3 will not fit in your front pocket. But then again, if you are buying a 5 inch device, you already know that.

The Screen:

The 1080 x 1920 pixels, 5.0 inch screen has a pixel density of 441 ppi. It is immensely sharp and delivers colours pretty well. The Corning Gorilla Glass 3 will prevent small bumps and scratches on your precious new screen. The MIUI is amazingly simple and to the point.

The MIUI Skin:

The MIUI is really beautiful. There are hundreds of themes available for free and each is of top quality. There are updates almost every month which fix bugs and improve performance among other things. Notifications and quick settings are easy to see and use. The All Apps screen is no more so you’ll have to get used to seeing all your apps on the home screen.

Connectivity:

3G, 2G, GPS, GLONASS, WiFi, Bluetooth 3.0, USB On the Go cover all the bases. There is no HDMI Out, but you can mirror your screen on a TV using Miracast.

Under The Hood:

The Xiaomi MI3 runs on the capable Snapdragon 800 chipset with a quad-core 2.3GHz Krait 400 processor, Adreno 330 GPU and 2GB of RAM. It performs well in all benchmark tests including CPU, GPU and RAM tests. More than whats needed for daily use and powerful enough for taxing games as well.

The Camera:

A 13.1 Mega Pixel primary camera and a 2 Mega Pixel secondary camera ensures good quality photos. The primary camera is sharp and low light performance is good. The exposure and ISO settings can be tweaked. The exposure can go up to 2 seconds. The photos are really sharp and detailed in good lighting conditions. Even the front cam takes impressive selfies 😉

The Software:

The Xiaomi Mi3 runs MIUI on top of Android 4.4 Kit Kat. Many of the settings which were hard to turn on or off in plain android are easier to access in MIUI. The contact management and phone functions work just as you expect them to.

The Battery:

The Xiaomi Mi3 has a 3050 mAh non-removable battery. Battery life is impressive and easily lasts a whole day of heavy usage. Normal usage should see you around 3 days. The Battery is one of the Killer Features which should make you consider this phone.

Problem with the Back cases:

Xiaomi went horribly wrong with the stick on back cases. They obscure the flash a tiny bit and glare the photos taken with the flash on. Avoid them at any cost.

Camera Pictures:

The Box:
IMG_20140829_214127_HDR

Random Wall:
IMG_20141004_174002_1

Selfie:
IMG_20141022_174034

Without HDR:
IMG_20141028_061759

With HDR:
IMG_20141028_061804_HDR

Verdict:

This device punches well above its weight. If you are looking for a phone in this range, I will suggest you go for it. Long battery life, sharp display, Unibody design, eye catching looks, and great software are some of the things you should consider. Some people have problems with this phone but I have seen none. Just avoid the back cases and you should be fine.

[TUTORIAL] Making a Platforming game with GameMaker Lite Part II

Sunday, August 17th, 2014

For part I of this tutorial, refer
Tutorial for making Platforming game with GameMaker Lite Part I

In this tutorial Ill be teaching you how to add a shootable gun to your platforming game. Well be starting off from Part I of this tutorial.

The gun will be placed somewhere in the level. Once you pick it up, you can shoot with it using the space key.

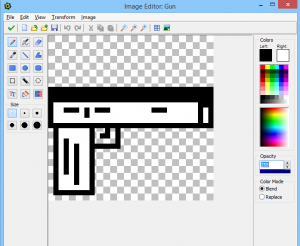
Start by creating a sprite for your gun. Name it “Gun”.

Create an object with the same sprite. Name it “Gun” as well.

1

In the Gun object, define a global variable which indicates if we can shoot or not.
To do this
Make an event which triggers on creation and have it execute this code:

global.Can_Shoot = 0;

Then create an even which triggers on collision with our Player object. Insert this code in it:

global.Can_Shoot = 1;
instance_destroy();

This lets us know that we can now shoot. It also destroys the Gun object.

Now open up our player object.
Insert this code along with the code to be executed on create:

fire_rate = 0;

Insert this in the step code:

fire_rate -= 1;

Once we fire our gun once, the fire rate will get resetted back to 50. We will be able to fire only once it reaches 0 again ie. in 50 steps. Ive used this method instead of GM’s inbuilt timer.

Create two gun sprites. One for facing left and the other facing right.
Create objects for them as well. Name one Bullet)Left and the other Bullet_Right.
Insert this code in the Bullet facing Left:
Create:

direction= 180;
speed= 5;

On collision with Block:

instance_destroy();

Insert this code in the Bullet facing Right:
Create:

direction= 0;
speed= 5;

On collision with Block:

instance_destroy();

In the Player object, create an event which triggers on pressing the space bar and insert this code:

if (global.Can_Shoot == 1)
{
if(fire_rate<=0) { if(dir==0) { instance_create(x,y,Bullet_Left); fire_rate=50; } if(dir==1) { instance_create(x,y,Bullet_Right); fire_rate=50; } } }

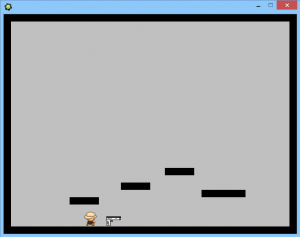
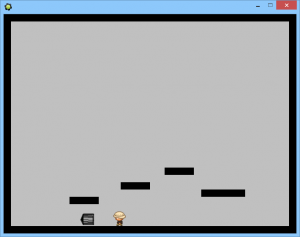
Right. Now just place your Gun object somewhere in the map and test it out.

The Gun should disappear when you touch it. You should be able to fire bullets at a fixed interval in whatever direction you are facing using the space key.

Good Luck. Comment here if you have any issues or if you need any of the code to be explained 🙂

2

Shooting Left:
4

Shooting Right:
3